Continuous Deployments with Docker Hub
by Kord Campbell on Nov 24, 2015

Swarm Inception is a simple application which implements continuous deployments using Docker Hub’s builder service. Builds are conducted via Github webhooks and when the build completes, Docker Hub will call this service’s webhook handler, which in turn triggers a deployment or update of the image built by Dockerhub onto Giant Swarm’s public cloud.
While Inception uses Giant Swarm’s APIs to implement CD onto our shared cluster, it could easily be repurposed to implement CD with other stacks and/or services.
There is a more detailed guide located on Github if you prefer and, as always, there’s a handy dandy video guide available:
Getting Started
This project should take you about 10 minutes to run through. We’ll start by forking the sample repo, setting up a Docker Hub account and then configuring it to build the repo.
Start Swarm Inception
You need to start the Swarm Inception service in your Giant Swarm account first. Check the repository out, switch to the directory, and begin the deployment process:
$ git clone https://github.com/giantswarm/swarm-inception.git
$ cd swarm-inception/
$ make deploy
Configuration file written to swarmconfig.py...
docker build -t registry.giantswarm.io/bant/inception .
...<snip>
Creating 'inception' in the 'bant/dev' environment…
Service created successfully!
Starting service 'inception'…
Waiting for 'inception' to get started…
Service 'inception' is up.
You can see all components using this command:

    swarm status inception

Use http://inception-bant.gigantic.io/bant/dev/hook on Docker Hub's hook to deploy a service.
Fork the Sample Service Repo
Next, head over to the swarm-flask-hello repo and fork it into your Github account. Make sure you leave the repository public!
There are detailed instructions on the repository’s README.md file you may follow. The basics are covered here for review, and require you have cloned your own fork of the repo locally.
Create an Automated Build on Docker Hub
Create an account on Docker Hub if you don’t have one, and then login.
Click on the Create pulldown on the top left of Docker Hub and then click on Create Automated Build. If you haven’t linked a Github account yet, you will need to do so before continuing with this step. Ensure you give Docker Hub read and write access to your Github account.
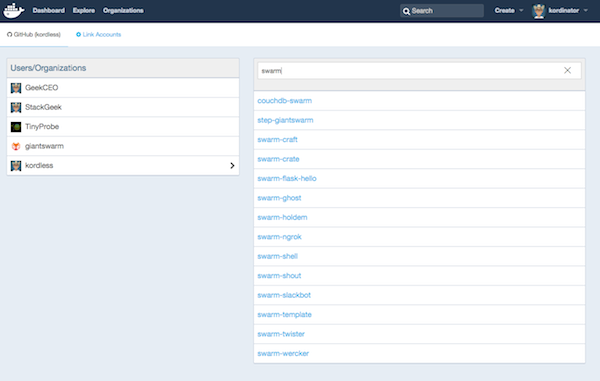
Once you’ve added an account, you’ll be shown a list of organizations and repos.

Select or search for the swarm-flask-hello repository in the list Docker Hub displays. Once you’ve selected the repository, you’ll be presented with the Automated Build page:

As shown in the screenshot, you will need to add a snippet of JSON to the “short description” for the build repo. The reason for this is because Docker Hub won’t pass on the Github repository information in the POST hook call we’re going to set up in a few minutes.
Here’s a sample of the JSON you need to paste in:
{"github": {"org": "bant", "repo": "swarm-flask-hello", "branch": "master"} }
Substitute your Github username for bant in the example above and then click on the “Create” button at the bottom of the page to create the new Docker Hub repository build.
Create a Webhook to the Inception Service
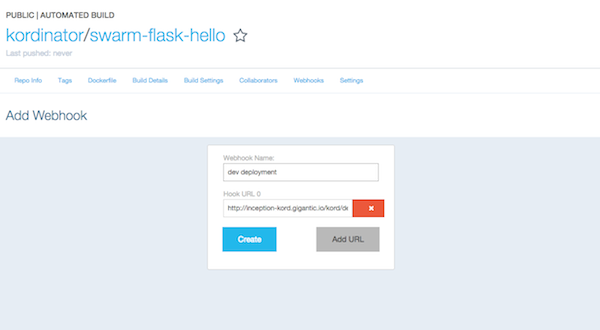
Finally, click on the “Webhooks” tab in the Docker repo and then click on the “Add Webhook” button to create a new webhook. You’ll use the following URL format for the URL:
http://inception-<username>.gigantic.io/<org>/<env>/hook
Change the <username>, <org> and <env> entries above to whatever was output by the launch of the Inception service above.

Name the webhook something like dev deployment and then click on “Add URL” to finish adding the webhook URL.
Do a Commit to the Flask Hello Project
Builds and deploys for the swarm-flask-hello project occur when you do code pushes to the master branch of your newly forked swarm-flask-hello repo. To trigger the build, navigate back to the project’s repo in your Github account and edit the index.html file in the templates directory to look something like this:
<!doctype html>
<title>Hello from Barcelona!</title>

  <h1>Hello Bants!</h1>

When you are done editing the file, click on the “Commit changes” button at the bottom. Docker Hub will start building your image within 10 minutes or so. When it is done, it will call the swarm-inception service you started in the previous section, or update it if it was already running.
Access the New Service
To access the newly built swarm-flask-hello service, you will use the following URL format:
http://sample-<username>.gigantic.io/
Keep in mind if you do subsequent commits to your directory, Docker will do a build of the image and then call an update on your Giant Swarm service!
You May Also Like
These Related Stories

Deploy a Ghost Blog in 10 Minutes with Giant Swarm
Right before I started working fulltime at Giant Swarm, I authored a containerized deployment of Ghost which could be used by anyone to deploy a blog …

Swacker: Code to Container, No Docker Required
The dream of most development teams is to have a setup where code is committed, built, and tested on a continuous basis. This practice is called conti …

Deploy a Clojure application in Under 1 Minute
After having deployed a Meteor application in under 1 minute, I thought I’d try myself at another deployment. This time I wanted to go for something d …